
School Management System
User Manual
─
Author: ALHAZEN TECHNOLOGIES TEAM
Chapter 1 Academic
Administration
Algaurizin eliminates paperwork and manual management
with complete paperless administration. Academic
Administration module automates your academic related procedures while
minimizing strategy mistakes. It enhances school performance and keeps your
students and teachers data effectively organized. Academic Administration helps you configure and manage multiple
exams according to your institution's system and process. Algaurizin
has a strong permission-based model, ensuring your staff can only use modules
or parts of modules appropriate to their role. With Exams Module of algaurizin, you can create exams, define marking grades,
and manage subject-wise marks for exams or generate exams sheets online.
Note: Before moving to the exam settings, make sure
that the subjects have been added. If not then the steps to be followed to add subjects
are explained below.
CONTENT
1.
Manage Subjects
2.
Exam Grades
3.
Exam Types
4.
Exam Term
5.
Exam Paper
1.1 Manage Subjects
Menu Location: Academic Administration
> Manage Subjects.
Description: Managing subjects has just become easier. In this section you can manage subjects for different levels and classes of your campus. Subjects can be added by clicking on the 'Add a new Subject’ button.
User actions: User actions that can be
performed include adding and editing records.
Add New Subject
Click “Add” button and enter the relevant
information.
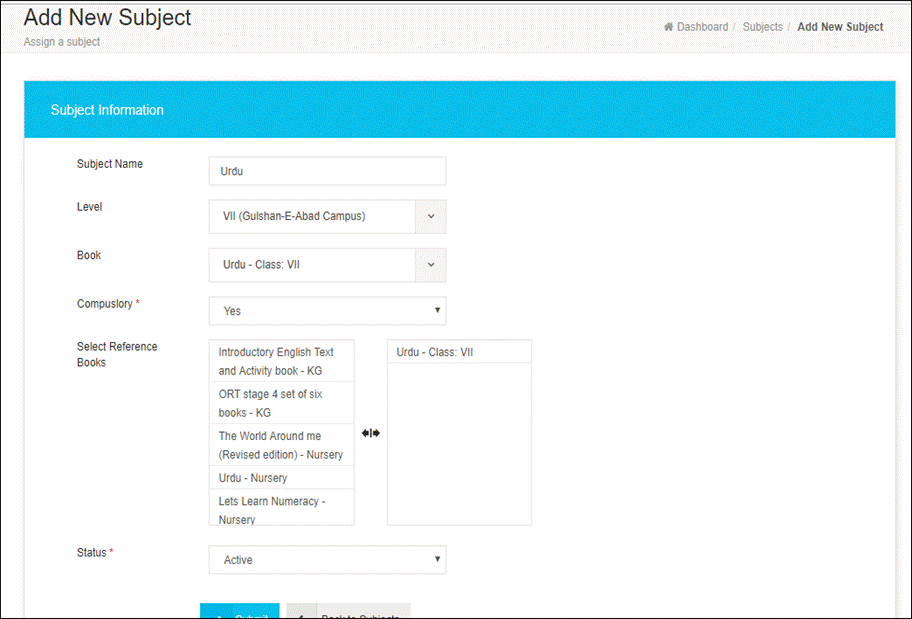
Subject Name : Here you can specify subject name.
Level : Choose level from the drop down list.
Book : Choose
book from the drop down list.
Compulsory : Choose yes or no for compulsory.
Select Reference Books : Select reference book name.
Status : Choose active or inactive. Status will be active for the new
subject. Setting it to Inactive will delete the subject.
After this Click on Submit.
Proceed
to the next Manu Exam Grades.
1.2 Exam Grades
Menu Location: Academic
Administration > Exam Grades
Description: Utilizing Algaurizin Exam Grades module, you can effortlessly define
and manage grades for the whole school with great accuracy as per your school
policies. Algaurizin
has the provision to display the result on grading system and grades can be
defined on the basis of percentile, like 90 % -100 %, will come under grade A+
and 30%-40% will come under grade E.
User actions: User actions that can be performed include adding, editing, and
searching records.
Add New Exam Grade
Click on
“Add” button in menu and enter the
relevant information.
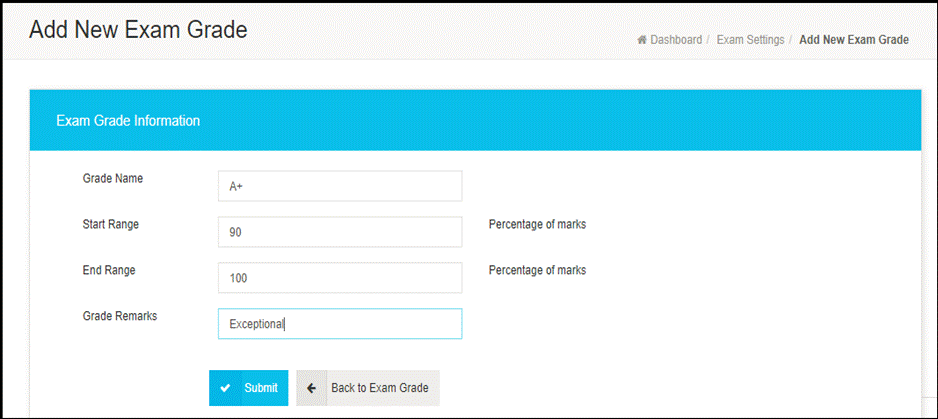
Grade Name : Here you can add grade name, e.g. A+
Start Range : Specify start range, e.g. 90.
End Range : Specify end range, e.g. 100.
Grade Remarks : Specify grade remarks here.
After this Click on Submit.
Proceed
to the next Menu Exam Types.
1.3 Exam Types
Menu Location: Academic
Administration > Exam Types.
Description: You can create
and manage the schedule of different exam types for different standards. Exam
type will define an examination type that will be repeated multiple times during
the academic year. An exam type can have multiple exam terms. Exam Types section
allows you to create various types of exam types, including qualifying exams,
midterms, periodic tests and many more.
User actions: User actions that can be performed include adding and editing
records.
Add Exam Type
Click “Add” button and enter the relevant
information.
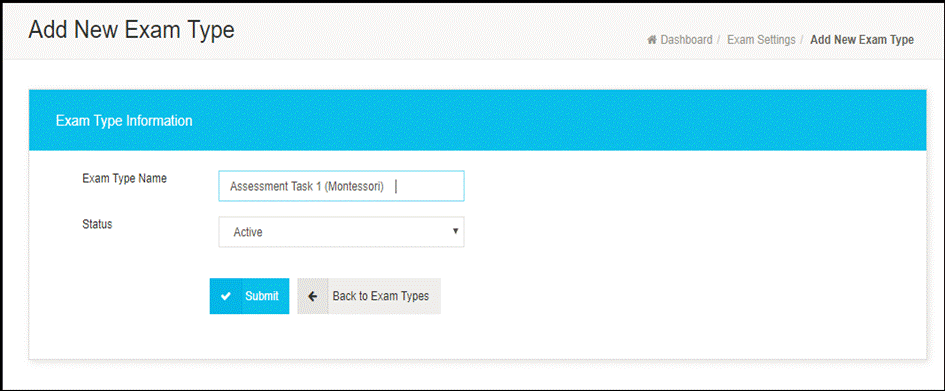
Exam Type Name : Enter
Exam Type here, e.g. quiz.
Status : Status will be active for the new exam type. Setting it to
Inactive will delete the exam type.
After this Click on Submit.
Proceed
to the next Manu Exam Term.
1.4 Exam Term
Menu Location: Academic Administration > Exam Term.
Description: Exam Term is the actual exam
that will be taken during the examination year. Each exam term will be associated with the exam
type that you have created earlier. There can be multiple exam terms under an
Exam Type. You can create a schedule of the examination terms for different standards
and different exam types here.
Select Session: Select the session from the drop down list of the sessions, for
which you want to add exams.
Add Exam
Click “Add” button and enter the relevant
information.
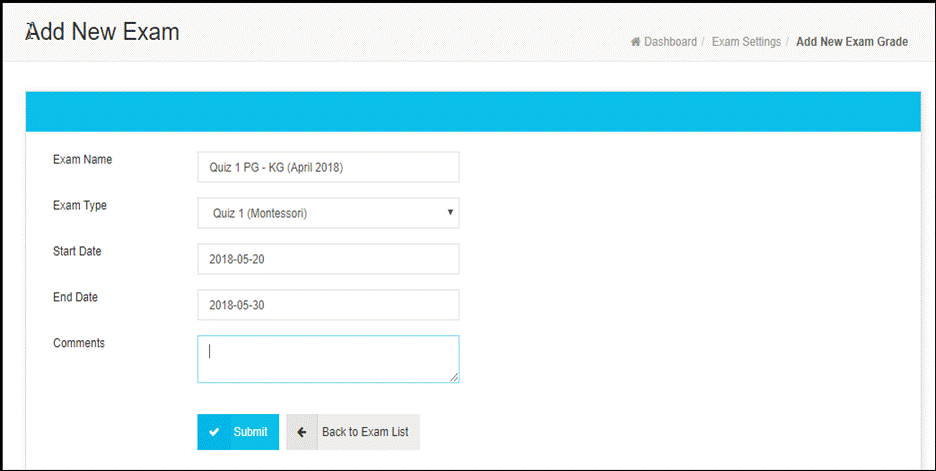
Exam Name : Specify
Exam name.
Exam Type : Select
Exam Type from the drop-down list.
Start Range : Specify start date.
End Range : Specify end date.
Comments : Add
any comment for this exam.
After this Click on Submit.
Proceed
to the next Menu Exam Paper.
1.5 Exam Paper
Menu
Location: Academic Administration > Exam
Paper.
Description: You can create exam papers for the different exams here.
Select Session: Select the session from the drop down list of
the sessions, for which you want to add exams.
Select Class: Select
the class for which you want to add exam paper.
Add Exam Paper
Click “Add” button and enter the relevant
information.
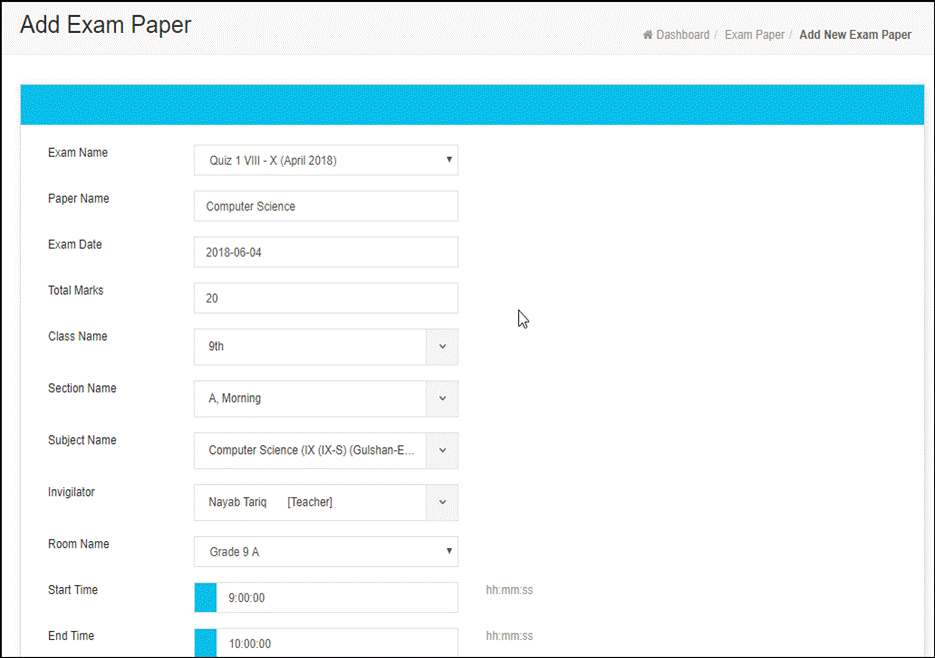
Exam Name : Select
Exam name from the drop down list
Paper Name : Type
the subject or paper name here.
Exam Date : Specify
Exam date.
Total Marks : Specify
Total marks.
Class Name : Select class name.
Section Name : Select Section name.
Subject Name : Select Subject name.
Invigilator : Select invigilator’s name from the list.
Room Name : Select room
name.
Start Time : Select start time.
End Time : Select end time.
After this Click on Submit.
v
Academic Administration Module Ended Here.
Chapter 2 Exam Result Management
CONTENT
Academic
Exam
1.
Manage Marks
2.
Manage Result Remarks
3.
Exam Result Sheet
Overview:
A comprehensive Exams results module is created in Algaurizin for easy management of different exam and test
results. It is designed to support the different components of the exam result
process. This module lets you perform all the result related activities.
2.1 Manage Marks
Menu Location: Academic > Exam > Manage Marks.
Description: Here you can
manage and update marks of all the students. After exams you can enter students obtained marks in the manage
exam section, and it will automatically display those marks.
Also the remarks and grades for those marks
will be displayed when you will add marks for any student against any subject.
You can also edit the marks after adding.
Manage Exam Marks
Enter the
relevant information.
Select Class : Select class
name.
Select
Section : Select Section
name.
Select Exam : Select Exam name.
Select Exam Paper : Select Exam Paper name.
Click on Manage Marks.
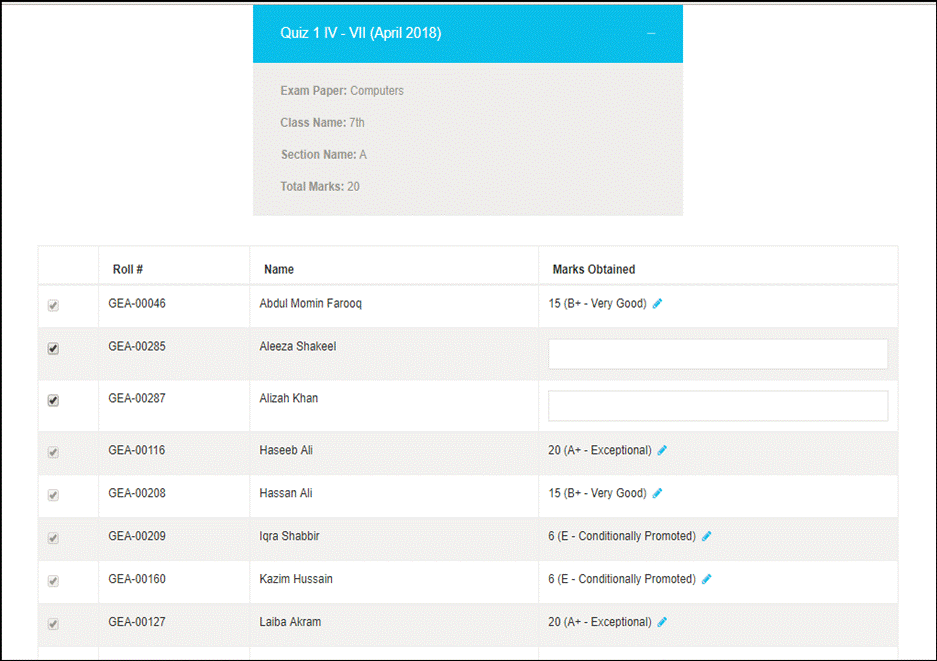
After this Click on Save Changes.
Proceed
to next page Manage Result Remarks.
2.2 Manage Result Remarks
Menu Location: Academic >
Exam > Manage Result Remarks.
Description: Where it is required to add overall remarks for a student’s
results, this page helps you add those remarks. You can add multiple predefined
remarks for a class or level and then associate any of them with a student’s
result. You can select one of the predefined remarks and edit them if required
or you can enter a new remark altogether.
Add New Result Remarks
Click “Add” button and enter the relevant
information.
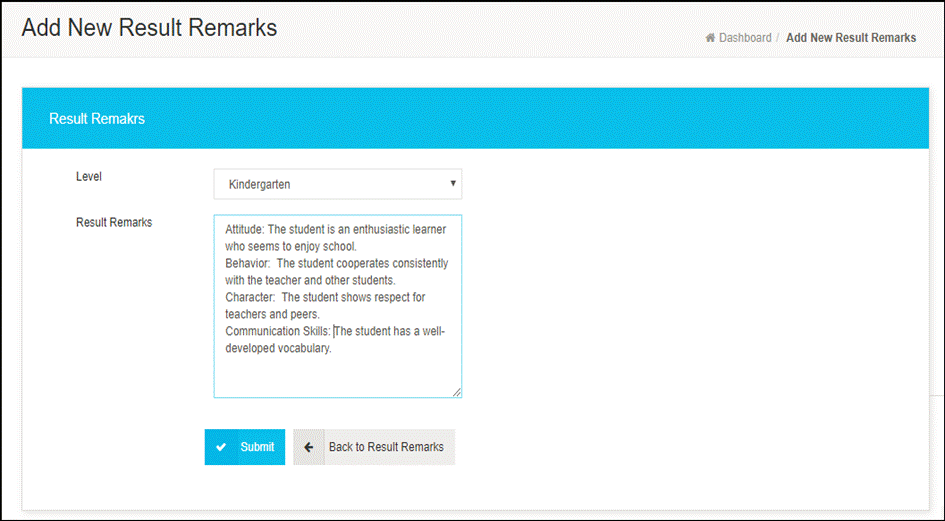
Level : Select
class or level.
Result Remarks : Add
result remarks. You can add multiple remarks.
After this Click on Submit.
Proceed
to next page Exam Result Sheet.
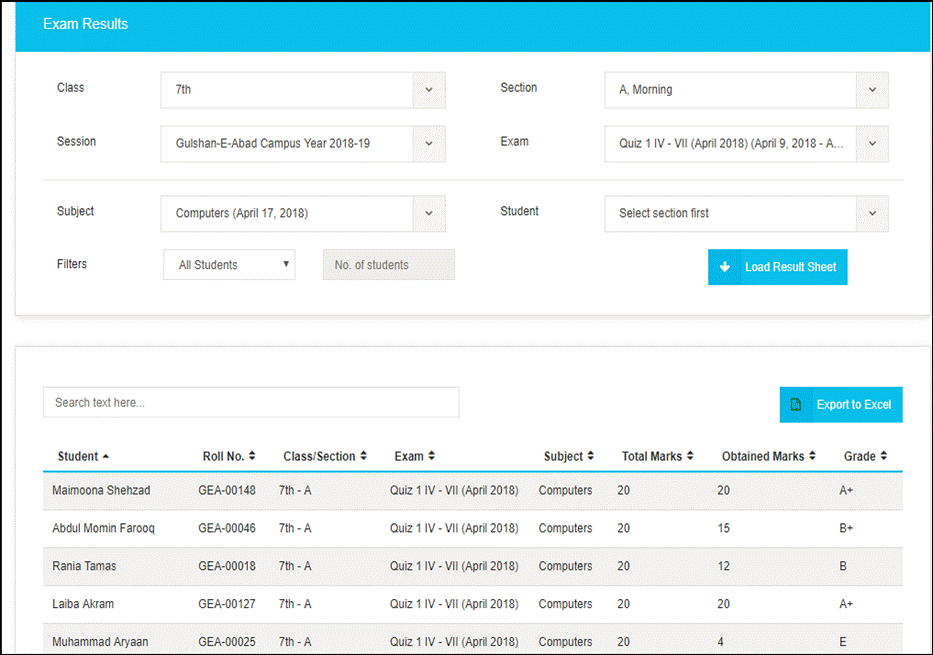
2.3 Exam Result Sheet
Menu Location: Academics >
Exam > Exam Result Sheet.
Description: This module provides the facility to generate result sheet. With
the help of this module information related marks of an examination for a
particular student, class, and section can be retrieved on the click of a
button. This option enables user to get the detailed report of the exam result.
You can
also export the result to Excel for further analysis or printing.
Exam Results
Enter the
relevant information.
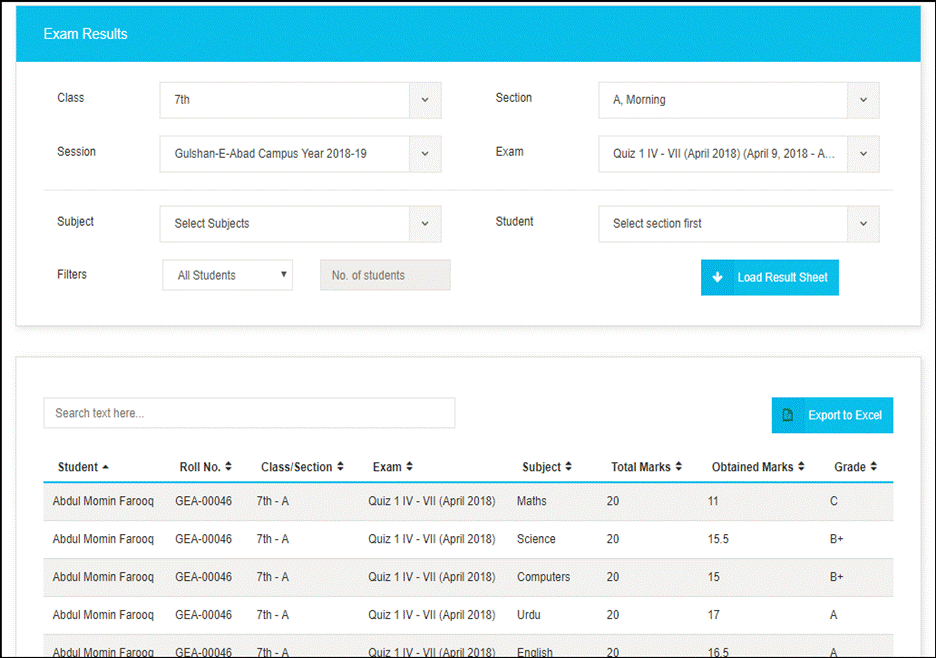
Class : Select class
name.
Section : Select Section name.
Session : Select Section name.
Exam : Select
Exam Name.
Click on Load Result Sheet.
You will get the exam result.
Exam Results > Subject
wise
Description: You can also get the Exam Result subjects wise. Just select the
specific subject of which you want to get the exam result and then click on the Load Result Sheet. You will get exam
result subject wise.
Enter the
relevant information, select any subject and then click on the Load Result
Sheet.
Click on Load Result Sheet.
You will get result subject wise.
Exam Results > Student
wise
Description: You can also get the Exam Result of the particular student. Just select the specific student name from the
drop down list of student and then click on the Load Result Sheet. You will get exam result student wise.
Enter the
relevant information, select any student name and then click on the Load Result
Sheet.

You will get the result of the particular
student, whose name you have selected from the drop down list of the student.
Exam Results > Filters
Description: This option enables user to get the Exam Result as Top students
and bottom students. Just select the top students or bottom students and then
enter any number in No. Of Students. Click on the Load Result Sheet.
Top Students
If you
want to see who are the 5 top students of your class, you can see them here.
Enter the
relevant information, select top students and enter any number in No of
students, e.g. 5 or 10, etc.
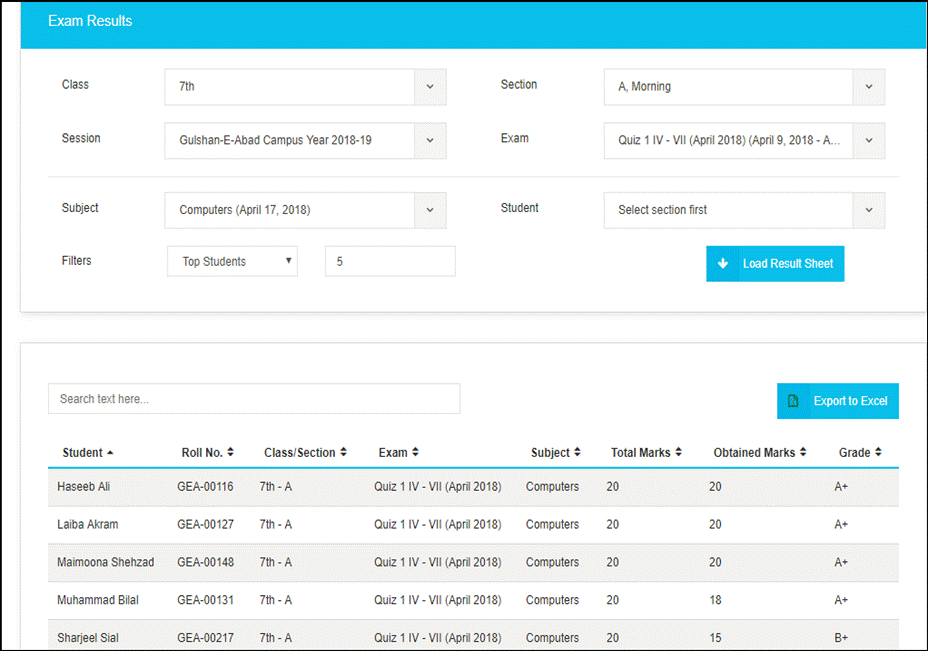
After this Click on Load Result Sheet.
Bottom Students
If you
want to see who are the 5 bottom students of your class, you can see them here.
Enter the
relevant information, select top students and enter any number in No of students,
e.g. 5 or 10, etc.
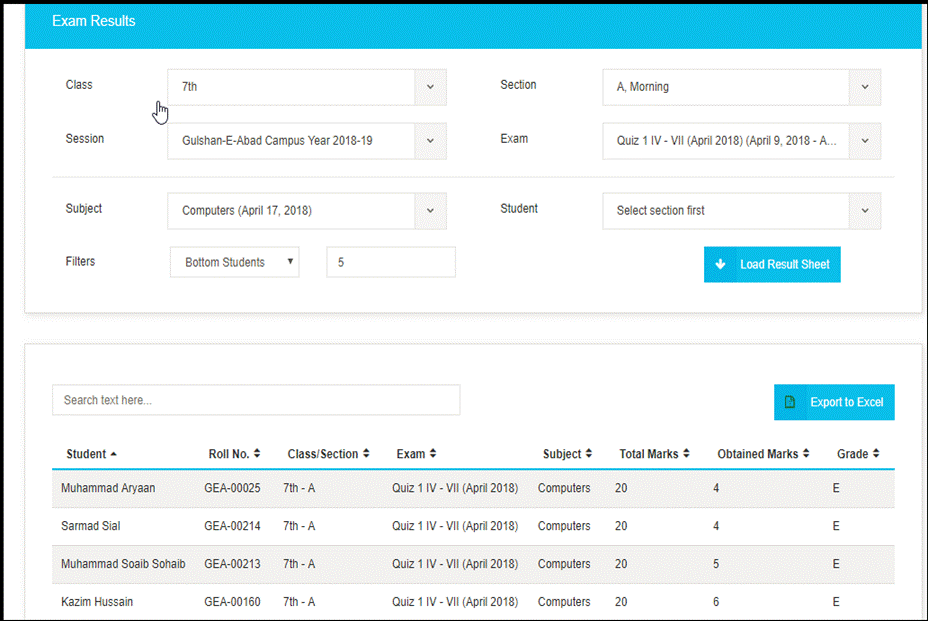
After this Click on Load Result Sheet.
v
THE END
Last
Updated: 30th May 2018